GreenBeans DIY Pads
If you want to make yourself some reusable cloth pads, but aren't sure exactly where to begin, then you've come to the right place!
You can purchase our DIY Cloth Pads Kit, which contains all the fabrics you need to get started, or you can follow the links below to add the materials to your cart individually
Pads are a great stash & scrap buster - you can use up bits of PUL, suedecloth and bamboo that you already have as well!
Kit Contents:
1x 150cm by 50cm piece of GreenBeans PUL (bottom, waterproof fabric)
1x 150cm by 50cm piece of Suedecloth (top, stay-dry fabric)
1x 150cm by 50cm piece of 340gsm Bamboo French Terry (core, absorbent fabric)
Other materials required: Sewing thread, a fabric marker or ballpoint pen, pins, scissors.
A note about absorbent layers
You will need several inner layers that will serve as your pad core. Each woman’s flow is different, so you may need to add or remove layers to create a pad that is just right for you. Using the 340gsm bamboo french terry fabric supplied, use 1 layer for light flow; 2 layers for medium flow; and 3 layers for heavy flow. We recommend not using more than 3 layers, as too many layers will make the pad difficult to get fully clean and dry.
2 layers is a good place to start with and trial. From there you will know if you need some 3-layer pads for heavier flow, or some 1-layer pads for lighter flow, or a combination of all 3, to suit your particular needs.
Directions:
Depending on the size you choose to make, the kit will make approx. 8-10 pads.
If you are purchasing fabrics separately please note that you will have to purchase different sized amounts than what is supplied in the kit.
- Prewash your bamboo fabric on a HOT wash and dryer cycle if possible. This pre-shrinks the bamboo fabric BEFORE you cut and sew it. Not prewashing your bamboo will result in your pads warping and twisting. NOTE: If you have selected the BLACK pad kit, then you must also prewash the suedecloth (top) layer at least twice, to remove any excess dye.
- Trace and cut out pad templates on some stiff cardboard or plastic.
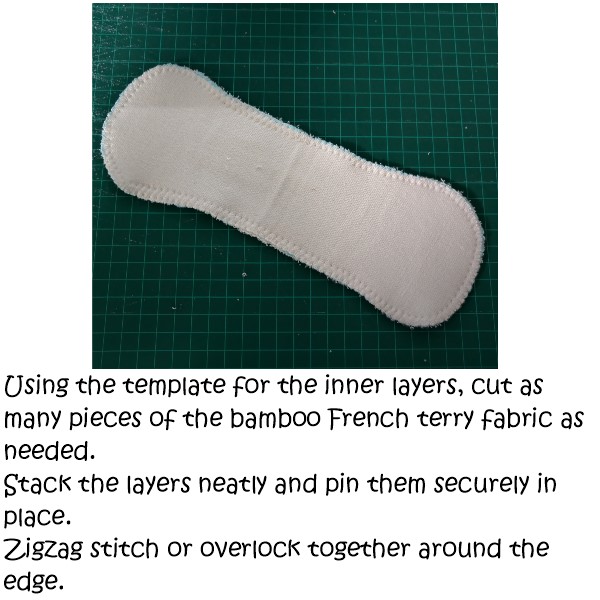
- Trace and cut absorbent core layers. Using the template for the inner layers, cut as many pieces of the bamboo French terry fabric as needed, see note above. Stack the layers neatly and pin them securely in place. Zigzag stitch or overlock together around the edge, or sew by hand if you wish.
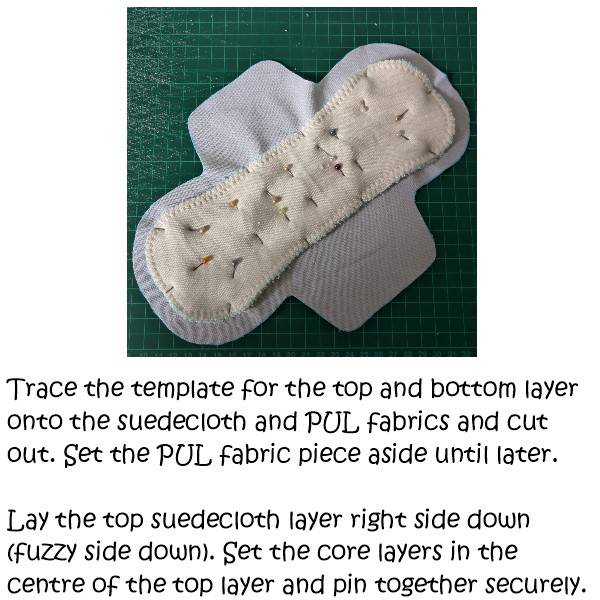
- Trace and cut your top and bottom layers. Trace the template for the top and bottom layer onto the suedecloth and PUL fabrics and cut out. Set the bottom PUL fabric piece aside until later.
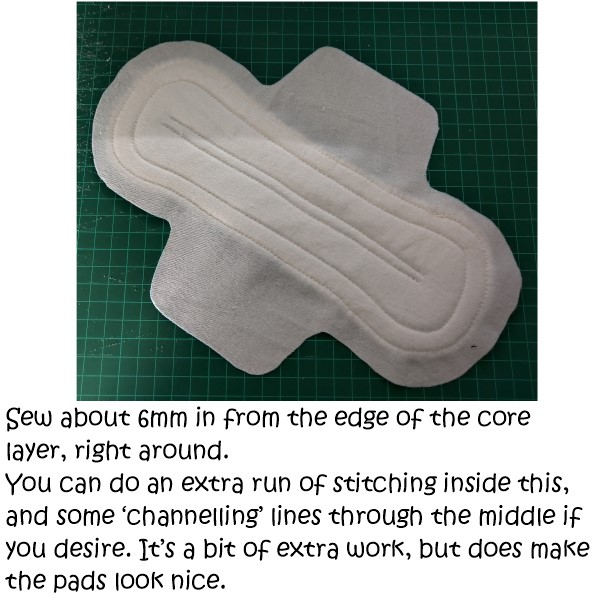
- Sew the core layers to the top layer. Lay the top suedecloth layer right side down (fuzzy side down). Set the core layers in the centre of the top layer and pin the pieces together securely. Sew about 6mm in from the edge of the core layer, right around. You can do an extra run of stitching inside this, and some ‘channelling’ lines through the middle if you desire. It’s a bit of extra work, but does make the pads look nice.
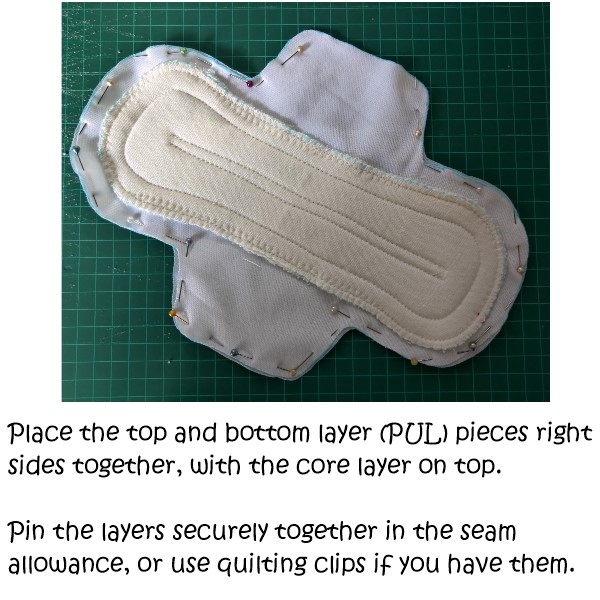
- Assemble all the layers. Place the top and bottom layer fabrics right sides together, with the core layer on top. Pin the layers securely together in the seam allowance, or use quilting clips if you have them.
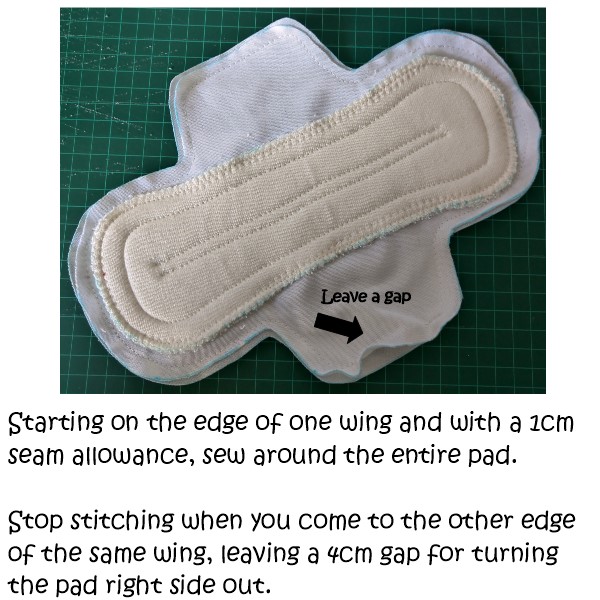
- Sew the pad together. Starting on the edge of one wing and with a 1cm seam allowance, sew around the entire pad. Stop stitching when you come to the other edge of the same wing, leaving a 4cm gap for turning the pad right side out. Go slowly, adjusting your presser foot as necessary to help the PUL feed through your machine evenly. You will sew very close to, but not on, the core layers at each end of the pad.
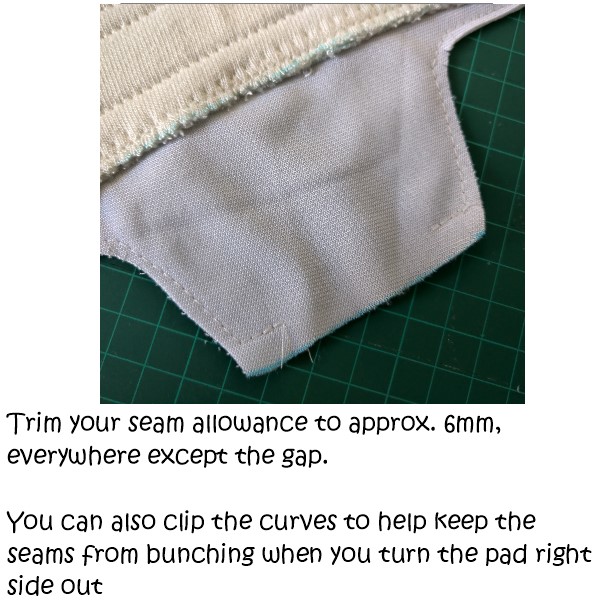
- Trim your seam allowance to approx. 6mm everywhere except the gap. You can also clip the curves to keep the seams from bunching when you turn the pad right side out.
- Turn the pad right side out through the gap. Use a chopstick, pencil or knitting needle to smooth out the seam and get the wing corners square.
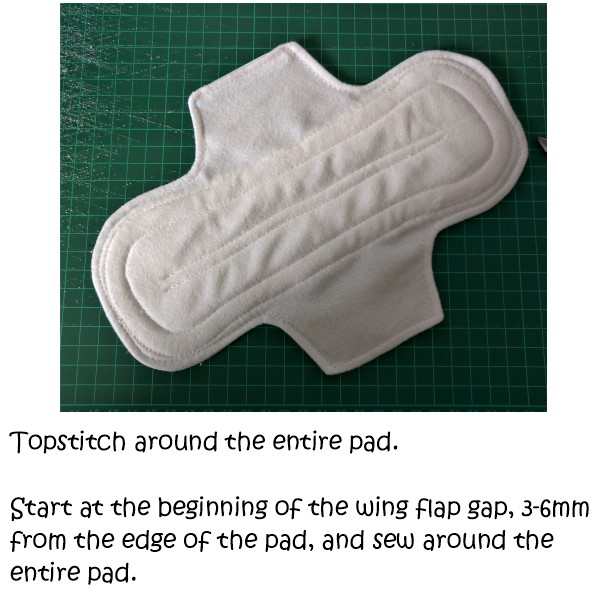
- Fold the seam allowance on the wing flap gap inwards. Pin and stitch closed, and topstitch around the entire pad. Start at the beginning of the wing flap gap, 3-6mm from the edge of the pad, and sew around the entire pad.
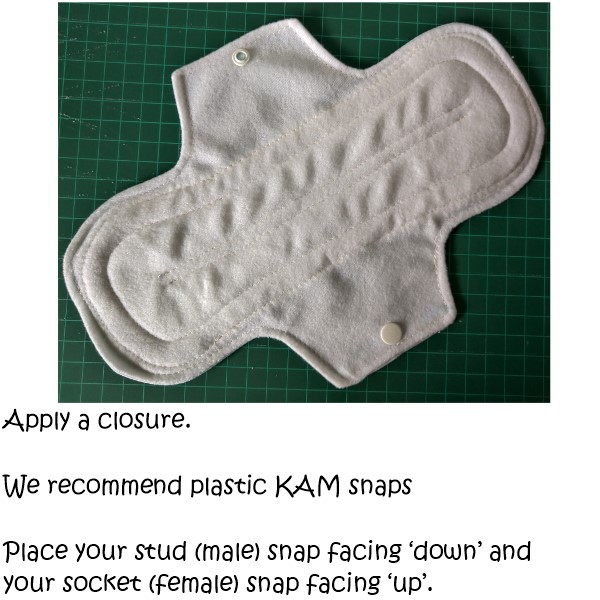
- Apply a closure. We recommend plastic KAM snaps, but you can use metal or sew-on ones if you wish. Place your stud (male) snap facing ‘down’ and your socket (female) snap facing ‘up’. You could use Velcro, but it will be bulky. A button and buttonhole is also an option.

Congratulations!
You have sewn your own pad. Well done!
Carry on with the remainder of the fabric in the kit. Depending on your chosen size and placement, you should get 8-10 pads out of the kit.
You can make adjustments to the pad and core patterns as desired, to make the final pads longer or narrower.
To use, place one pad inside the underwear, with the top suedecloth layer against the skin. Wrap the wings around the underwear and fasten together underneath. Change regularly, even if not fully soaked, to keep your skin healthy. Unlike disposable pads, you can reuse these hundreds of times, so swapping out a barely-wet pad for a new one isn’t a ‘waste’.
Rinse pads in clean water and place in a bucket or tub of water to soak. Change this water daily, until you are ready to wash. When it is time, wash your pads on a normal cycle as you would wash your clothing. No need to wash separately as any menstrual fluids will have already rinsed / soaked out of the pad. Use regular detergent, and avoid fabric softeners. Line dry in the sun, or in a hot dryer. You can safely soak your pads in a stain-remover like Napisan if you wish.
SIGN UP FOR OUR NEWSLETTER
